
Bushcraft shelter ideas are designs and constructions used in outdoor activities to provide protection and shelter from the elements. Having a good shelter in bushcraft activities is important for staying safe and comfortable, especially in unpredictable or extreme weather conditions.
The right shelter can make a significant difference in the success and enjoyment of outdoor adventures.
Check out this Youtube video: Get inspired by amazing bushcraft shelter ideas and learn valuable survival skills from a resourceful girl building a warm shelter in the wilderness.
Basic Types of Bushcraft Shelters
Tarp Shelter Designs
Tarp shelter designs are versatile and essential for bushcraft survival. They provide protection from the elements and can be quickly set up using a simple tarp.
As part of your bushcraft shelter ideas, consider the wide range of designs, such as the A-frame tarp shelter, sunshade tarp shelter, and lean-to tarp shelter. Each design offers specific benefits, ranging from efficient rain shedding to increased wind resistance.
For example, the A-frame tarp shelter provides excellent protection from rain when oriented in the direction of the prevailing winds, while the lean-to tarp shelter offers simplicity and requires minimal resources for assembly.
To optimize your bushcraft shelter, it’s crucial to understand the various tarp configurations, such as flat tarps with even edges and shaped tarps with specific designs tailored to different environmental conditions. Experimenting with different tarp shelter designs enhances your understanding of how to adapt to diverse terrain and climates, providing an invaluable skillset for efficient bushcraft shelter building.
Debris Hut Construction Techniques
Debris hut construction techniques are vital skills for creating a sustainable and insulated wilderness shelter. To build a debris hut, start with a ridge pole supported by two Y-shaped sticks.
Then, lay ribs (sticks) along the ridge pole to form the hut’s framework. Layer an abundance of leaves over the framework to ensure effective insulation.
By incorporating a variety of natural materials and leveraging the surroundings, you can construct a debris hut that provides warmth and protection from harsh weather conditions.
To construct a more elaborate debris hut, follow a systematic approach involving precise steps, like locating the ideal spot, securing the ridge beam, and building a retainer wall if necessary. Each step is critical in ensuring the structural integrity and functionality of the debris hut, enabling you to adapt to diverse environments and varying degrees of available resources.
Lean-To Structures
Lean-to structures are fundamental bushcraft shelters that are quick to build and offer reliable protection. Understanding how to construct a lean-to shelter with natural materials is essential for adapting to different terrains and prevailing weather conditions.
By leaning smaller branches against a central base branch to form a 45-degree angle from the ground, you establish the foundation for the shelter. The gradual addition of smaller branches reinforces the structure, creating a sturdy and dependable lean-to shelter.
When building a lean-to shelter, incorporating natural materials from the surrounding environment, such as logs for the raised bed and branches for the shelter frame, ensures minimal environmental impact while maximizing the shelter’s effectiveness. The process of creating a lean-to structure involves strategic placement and utilization of available resources, resulting in a reliable shelter option for bushcraft survival scenarios.
Choosing the Right Location for Your Shelter
Impact of environmental factors on shelter construction
When considering the impact of environmental factors on shelter construction, it’s crucial to assess the terrain and prevailing weather conditions. In a bushcraft setting, natural elements like wind direction, exposure to sunlight, and potential precipitation must be carefully evaluated. For instance, situating your shelter against a natural windbreak, such as a thick stand of trees, can provide protection from strong gusts and help in maintaining a comfortable internal temperature. Furthermore, the availability of suitable natural anchoring points, such as sturdy trees or large rocks, is essential to secure the structure against potential damage from strong winds.
In terms of environmental impact, it’s vital to employ sustainable construction practices, utilizing fallen or dead wood and vegetation for shelter construction. This not only minimizes the demand for live trees but also integrates the structure harmoniously with its surroundings. Additionally, understanding the local ecosystem and adhering to Leave No Trace principles ensures minimal disruption to the environment.
Safety considerations
When determining the safety considerations for your shelter location, prioritizing elevation and drainage is fundamental. Selecting a site that is slightly elevated from surrounding terrain aids in preventing water accumulation during heavy rainfall, thus avoiding potential flooding within the shelter. Furthermore, avoiding areas prone to natural hazards, such as avalanche paths, flood zones, or rocky outcrops susceptible to landslides, is indispensable for ensuring the safety and security of the shelter and its occupants.
Moreover, inspecting the nearby flora to identify any poisonous plants or potential allergens is crucial for safeguarding against environmental hazards. This comprehensive assessment reduces the risk of allergic reactions or inadvertent contact with harmful vegetation, promoting a safer and more secure shelter environment.
Availability of natural resources
In evaluating the availability of natural resources for shelter construction, a thorough survey of the surrounding area is essential. Assessing the proximity of suitable materials, such as sturdy branches, rocks for anchoring, and foliage for insulation, is vital for efficient design and construction. Leveraging resources like fallen branches, leaves, and mud for the construction process not only promotes sustainable practices but also attunes the shelter to its natural environment, ensuring optimal environmental integration.
Moreover, identifying an area abundant in water sources is advantageous, providing a readily available supply of drinking water and facilitating other essential activities such as cooking and hygiene. Understanding the ecosystem’s natural resources and their seasonal variations empowers shelter builders to adapt their construction schedule and techniques, optimizing the utilization of available materials while minimizing ecological impact.
| Natural Resource | Description |
|---|---|
| Fallen branches | Utilized for structural framework |
| Foliage | Insulation and weatherproofing material |
| Rocks | Anchoring points and stability foundation |
| Water sources | Critical for drinking, cooking, and hygiene |
Essential Tools and Materials
Discussion on the necessary tools for building shelters
When creating a bushcraft shelter, it’s crucial to have the right tools at your disposal. The essentials include a reliable survival knife for cutting branches and rope, a sturdy paracord for securing the structure, a versatile tarp to provide protection from the elements, a parachute for additional covering, a durable shovel for clearing the shelter’s foundation, and the ever-reliable duct tape for quick fix-ups.
Additionally, a multi-tool serves various purposes, while a survival axe offers efficient wood-cutting capabilities. A folding shovel proves invaluable when clearing debris and creating a stable base for the shelter. Lastly, a tent or a compact survival blanket provides extra insulation and comfort, essential for surviving in the wild.
Types of natural materials commonly used in bushcraft shelter construction
When constructing a bushcraft shelter, a variety of natural materials come into play. Pine needles and hardwood leaves are commonly used for insulation and waterproofing in debris shelters. Grasses and leaves can be utilized to form a comfortable bedding inside the shelter.
Moreover, natural materials like branches, rocks, and mud are used to build more robust structures such as lean-tos and A-frame shelters. Each material has unique properties that contribute to the stability and resilience of the shelter, making it crucial to select the right ones based on the environment and weather conditions.
Importance of proper gear for building shelters
Having the proper gear for building shelters is pivotal for survival in the wild. The right tools and materials ensure that the constructed shelters offer adequate protection and insulation. Therefore, equipping oneself with essential gear such as work gloves, a saw, a hatchet, a knife, and paracord becomes indispensable. These tools enable efficient construction and help create a secure and comfortable shelter, enhancing the chances of survival in challenging environments.
Furthermore, appropriate clothing plays a critical role in shelter-building endeavors. Dressing for the weather and having extra layers of clothing is essential to remain dry and warm, significantly contributing to the success of shelter construction in the wilderness.
| Essential Tools | Description |
|---|---|
| Survival Knife | Cutting branches and rope |
| Paracord | Securing the structure |
| Tarp | Providing protection from the elements |
| Parachute | Additional covering for the shelter |
| Shovel | Clearing the shelter’s foundation |
| Duct Tape | Quick fix-ups and repairs |
| Multi-Tool | Versatile tool for various purposes |
| Survival Axe | Efficient wood-cutting capabilities |
| Folding Shovel | Clearing debris and creating a stable base |
| Tent or Survival Blanket | Extra insulation and comfort |
Tarp Shelter Designs
Creating a Tarp Shelter
To create a tarp shelter in the bushcraft style, you can start by considering the A-frame design, which is a popular and relatively simple option. First, find two sturdy trees with an appropriate distance between them and tie a paracord at a height that suits your shelter.
Then, use the paracord to drape the tarp over it, ensuring the sides hang evenly. Use stakes to secure the tarp to the ground, creating an angled roof with approximately 30 degrees.
This setup will offer a ten-foot living area underneath.
Alternatively, consider the Ultralight Tarp Shelter. Begin by staking one side of the tarp to the ground, then use extended trekking poles to support the corners of the tarp.
This method provides a windbreak and is particularly useful for backpacking due to its lightweight nature.
For a fresh approach, the “Monk Flat Tarp” from Mountain Laurel Designs is worth considering for a tarp shelter. Its unique design and durability make it suitable for various weather conditions, making it a versatile choice for bushcraft enthusiasts.
Various Configurations and Designs for Tarp Shelters
There are numerous configurations and designs for tarp shelters, from the classic A-frame to more intricate setups. One option is the “Lean-To Shelter,” which involves securing one side of the tarp to the ground and positioning the opposite side higher, creating a sloped roof.
This design allows for efficient rain runoff and is a practical choice in wet environments.
Another popular design is the “Diamond Fly Configuration,” which involves setting the tarp at a diagonal angle between trees, creating a diamond shape. This configuration offers excellent protection against the elements, making it an ideal choice for inclement weather.
Moreover, it provides ample headroom and sleeping space.
Advantages and Disadvantages of Tarp Shelters
The advantages of tarp shelters are their versatility and cost-effectiveness, making them an attractive option for outdoor enthusiasts. Tarp shelters are lightweight, easy to transport, and can be set up quickly, providing immediate shelter from the elements.
Additionally, they offer a minimalist outdoor experience, bringing individuals closer to nature while still providing essential protection.
On the other hand, tarp shelters may pose challenges in terms of security and protection from insects and wildlife. The open design of these shelters leaves occupants exposed to external elements, including bugs, animals, and neighboring campers.
Furthermore, limited privacy and security are inherent drawbacks of tarp shelters, requiring careful consideration when choosing this accommodation option.
| Pros | Cons |
|---|---|
| Versatile | Limited security |
| Cost-effective | Exposure to elements |
| Lightweight | Privacy concerns |
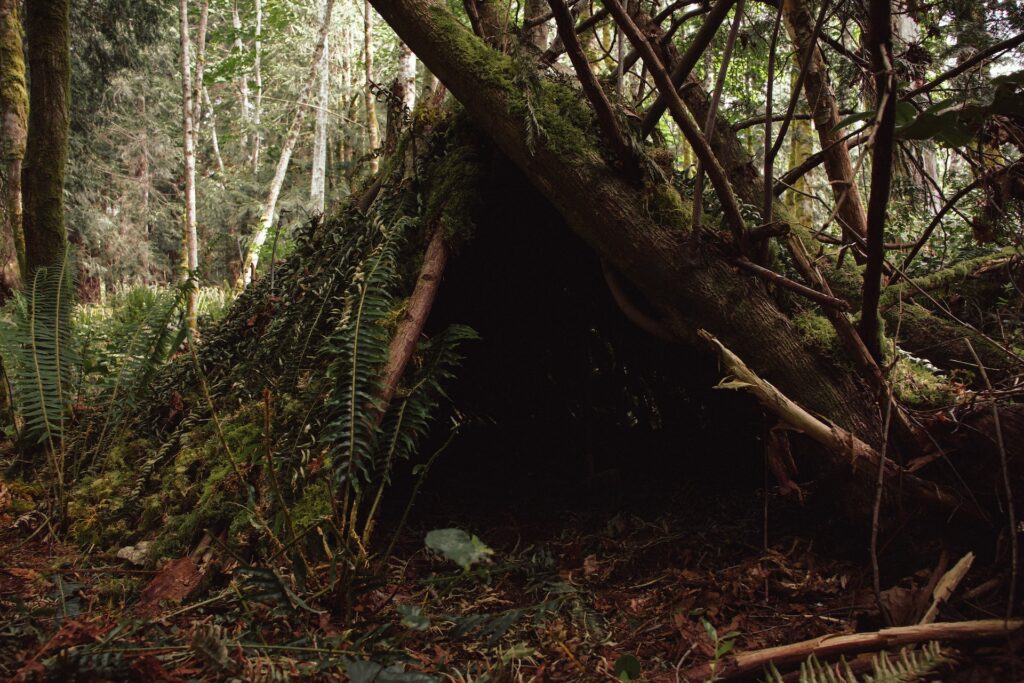
Debris Hut Construction Techniques
Step-by-step guide for building a debris hut
To construct a debris hut for bushcraft shelter, start by choosing a wooded location on high, dry ground and free from thickets, poison ivy, and brambles. Find a small, stout tree, a boulder, or a fallen tree trunk or stump to support the shelter.
Avoid very tall trees that might attract lightning during storms. Position and secure the ridge beam, ensuring it is sturdy and dependable for the hut’s structure.
Build a retainer wall if the shelter is on a slope to prevent materials from sliding down. Make the shelter roomy yet snug, ensuring it provides enough space while retaining warmth.
Once the foundation and framework are ready, gather a variety of natural materials such as sticks, leaves, moss, ferns, and bark. These materials will be used to create multiple layers for the shelter.
Start by weaving sticks together to form a lattice-like base. Layer leaves, moss, ferns, and bark over the lattice, creating a dense covering that will offer insulation and protection from the elements.
As the shelter takes shape, ensure that the walls are steep and thick to effectively insulate and shed rain. This can be achieved by adding a lattice work of fan-like branches with plenty of foliage to enhance the shelter’s ability to repel water.
Finally, create a thick thatching layer using dry leaves and branches to complete the roof, ensuring it is impermeable to rain and wind.
Construction of the debris hut complete! This will provide a sturdy, effective shelter for your bushcraft needs, protecting you from the elements and ensuring a safe, comfortable experience in the wilderness.
Tips for finding suitable natural materials
When scouting for natural materials to construct a debris hut, consider various elements such as the type of foliage available, the density of the materials, and their insulation properties. Look for an abundance of sturdy sticks, leaves, moss, ferns, and bark to create a robust covering for the shelter.
Ensure that the materials are dry and free from moisture to maximize their insulating capabilities.
While gathering materials, assess their durability and resistance to adverse weather conditions. Select materials that can withstand rain, strong winds, and cold temperatures to ensure the debris hut offers optimal protection and comfort.
Additionally, incorporate a variety of foliage to create a multi-layered covering that can efficiently repel water and maintain warmth within the shelter.
Remember to gather a surplus of natural materials to accommodate any potential repairs or adjustments to the shelter, enhancing its resilience and longevity. By choosing suitable natural materials, you can construct a debris hut that offers exceptional insulation and protection in a bushcraft environment.
Weatherproofing and insulation considerations
To weatherproof and insulate a debris hut effectively, prioritize the creation of steep and thick walls that can shed rain and provide ample insulation. The shelter’s walls should be fortified with multiple layers of natural materials, including leaves, moss, ferns, and bark, to effectively repel water and maintain warmth within the structure.
Furthermore, ensure that the roofing of the debris hut is layered with dry leaves and branches to create a sturdy thatching that is impermeable to rain and wind. This will provide a reliable barrier against adverse weather conditions, allowing the shelter to remain dry and secure in varying climates.
When building the shelter, pay close attention to its orientation and positioning within the natural environment. Align the debris hut to leverage natural features such as trees or terrain to provide additional protection from wind and rain.
By strategically considering weatherproofing and insulation elements, you can create a robust and reliable debris hut that safeguards against the challenges of the wilderness.
Lean-to Structures
Variations of the lean-to shelter design
When it comes to bushcraft shelter ideas, the lean-to structure offers a range of variations to accommodate different environmental conditions and individual preferences. One notable variation is the classic open-faced lean-to, which features a sloping roof with one end open to the elements. This design provides excellent ventilation and allows for easy access, making it suitable for milder climates. Another popular variation is the closed lean-to, which adds sidewalls to offer increased protection from wind and rain. For heavily wooded areas, the debris lean-to presents an ideal option, utilizing fallen branches and leaves for camouflage and insulation.
More advanced variations include the hybrid lean-to, which combines elements of other shelter designs such as the A-frame, and the elevated lean-to, which elevates the sleeping platform off the ground to avoid moisture and ground-cold retention. Each variation offers its own advantages and is tailored to specific conditions, ensuring that there is a lean-to shelter design suitable for any bushcraft setting.
Construction process for different types of lean-to shelters
Constructing a lean-to shelter involves a relatively straightforward process, but the specific techniques and materials used can vary depending on the chosen design. To build a classic open-faced lean-to, one would begin by selecting a sturdy ridge pole and securing it between two trees at an appropriate height.
Next, collect and lean long branches against the ridge pole at a slight angle, ensuring they are closely packed and provide ample coverage. Finally, cover the frame with a waterproof tarp or natural materials such as leaves or grass for insulation.
For a closed lean-to, the process is similar, but sidewalls made of additional branches or natural materials are added to form a more enclosed structure. When constructing the debris lean-to, the primary focus is on integrating natural foliage and debris to form a thick insulating layer, camouflaging the shelter and providing effective protection against the elements.
Innovative designs like the hybrid and elevated lean-to require additional construction steps and may involve more intricate techniques.
Pros and cons of using lean-to structures in bushcraft
Lean-to structures offer several advantages in the context of bushcraft. Their simplistic design and construction process make them accessible to beginners and experienced outdoor enthusiasts alike, allowing for quick and efficient shelter setup in emergency situations. Additionally, the open-faced lean-to’s ventilation characteristics are particularly useful in warmer climates, promoting airflow and minimizing condensation.
However, there are drawbacks to consider as well. While effective in many situations, lean-tos may not offer adequate protection in extreme weather conditions, especially if not properly insulated.
The vulnerability of the open side to wind and precipitation can also pose challenges, requiring additional attention to positioning and weather analysis for optimal shelter placement.
| Pros | Cons |
|---|---|
| Quick and efficient setup | Limited protection in extreme weather |
| Ventilation in warmer climates | Vulnerability to wind and precipitation |
| Accessible to beginners and experts |
Lean-to structures present a versatile and practical option in the realm of bushcraft shelter ideas, enabling individuals to build reliable and customizable shelters suited to their specific needs and environmental circumstances.
Insulated A-Frame Shelters
How to Build an A-Frame Shelter for Insulation
To build an A-frame shelter for insulation, start by selecting two sturdy poles and planting them firmly in the ground. These poles will be the base of your A-frame.
Then, find a long, sturdy ridgepole and lay it across the top of the two base poles, creating the classic triangular A-frame shape. Next, gather branches or sticks to form the main structure, weaving them horizontally between the ridgepole and the base poles.
This helps to give the shelter its shape and structure.
After the framework is set, it’s time to insulate the shelter. Collect a significant amount of foliage, like dried leaves, pine branches, or grass, and layer them densely on both sides of the A-frame.
Leave no gaps, and ensure that the shelter is thoroughly covered. This natural insulation serves as a barrier, preventing heat from escaping and keeping the shelter warm.
In addition, be mindful of the ground insulation. Place a thick layer of foliage or branches inside the shelter, providing a comfortable and warm base.
A well-insulated A-frame shelter can effectively protect against the harsh elements and maintain a comfortable temperature inside, making it a crucial part of bushcraft survival.
For a visual reference and understanding, refer to the table below for a detailed breakdown of the process.
| Step | Description |
|---|---|
| 1. | Plant sturdy base poles |
| 2. | Lay a long ridgepole across the base poles |
| 3. | Weave branches horizontally for structure |
| 4. | Gather and layer foliage for insulation |
| 5. | Insulate the ground inside the shelter |
Suitable Locations for A-Frame Shelters
Choosing the right location for an A-frame shelter is vital for its effectiveness. Look for areas with natural coverage, such as near thick trees or large rock formations.
This offers additional protection from wind and rain, enhancing the shelter’s insulation capabilities. Avoid low-lying areas prone to flooding and areas with poor drainage to prevent water seepage into the shelter.
Furthermore, consider the direction of the prevailing winds. Positioning the A-frame shelter to face away from the wind reduces exposure and helps maintain a comfortable environment inside.
Elevated grounds or gentle slopes also provide natural drainage and minimize the risk of water pooling around the shelter.
By selecting a strategic and sheltered location, you can maximize the functionality of the A-frame shelter and ensure optimal insulation for bushcraft survival.
Benefits of Using Insulated A-Frame Designs for Bushcraft
Insulated A-frame designs offer several advantages for bushcraft enthusiasts. The natural insulation provided by foliage and branches maintains a consistent temperature inside the shelter, protecting against extreme cold or heat.
This is particularly beneficial during inclement weather, ensuring a comfortable and safe environment for extended stays in the wilderness.
Moreover, A-frame shelters are relatively easy to construct, utilizing natural resources and minimal equipment. Their compact design makes them efficient for heat retention and provides a cozy space for rest and recuperation during bushcraft excursions.
The simplicity of the design allows for quick assembly and dismantling, offering flexibility for mobile camping setups.
Insulated A-frame designs are an invaluable asset for bushcraft, offering reliable insulation, ease of construction, and adaptability to diverse environments, making them an essential component of bushcraft shelter ideas.
Snow Shelters for Winter Bushcraft
Construction techniques for snow shelters
When it comes to building snow shelters for winter bushcraft, several construction techniques can be employed. One popular technique is the snow trench, which involves digging a trench in the snow to create a protective shelter.
Another technique is the tree pit, which utilizes the natural cover provided by trees to create a sheltered space. Additionally, snow caves, quinzhees, and igloos are traditional construction techniques that provide insulation and protection from the elements.
Each technique requires careful excavation and shaping of the snow to form a secure and viable shelter.
Unique considerations for winter survival shelters
Winter survival shelters require unique considerations due to the extreme weather conditions. The choice of location is crucial, as it directly impacts the effectiveness of the shelter.
It’s essential to consider insulation and moisture control to prevent heat loss and dampness inside the shelter. Moreover, proper ventilation is essential to maintain air quality and prevent condensation.
Additionally, familiarity with the surrounding terrain and potential snow accumulation areas is vital for selecting the most suitable shelter design. Considering these unique factors ensures the creation of a robust winter survival shelter.
Comparison of different snow shelter designs
When comparing different snow shelter designs, several factors come into play. Snow caves offer natural insulation and are more spacious, but their construction requires significant effort and skill.
Quinzhees are easier to construct and offer excellent insulation, making them suitable for prolonged stays. Igloos are renowned for their thermal efficiency and are well-suited for extreme cold, albeit requiring expertise in construction.
Tree pits provide natural cover and are relatively easy to build, making them ideal for emergency situations. By comparing these designs in terms of insulation, ease of construction, and suitability for different conditions, one can make an informed choice when building a snow shelter.
Elevated Platform Shelters
Building an elevated platform shelter for added protection
When it comes to bushcraft shelter ideas, an elevated platform shelter provides enhanced protection from wildlife, moisture, and potential flooding. To build an elevated platform shelter, start by selecting sturdy trees with the right distance between them to support the platform. Next, create a framework using branches, logs, and sturdy materials, ensuring it can withstand the weight of the shelter and occupants. Then, lay a foundation by securing the support beams and adding a sturdy flooring, creating a stable base. Finally, construct the shelter on top of the platform, ensuring it’s weatherproof and offers adequate protection from the elements.
Safety and stability considerations for platform shelters
Safety and stability are crucial when constructing elevated platform shelters in a wilderness setting. To ensure safety, thoroughly inspect and test the chosen trees for sturdiness and stability before building the platform.
Use reliable knot-tying techniques and high-quality cordage to secure the framework, ensuring it can support the weight of the shelter and its occupants. Additionally, consider adding railings or barriers to prevent falls and injuries, especially in adverse weather conditions.
Regular maintenance and inspections are also essential to ensure the ongoing safety and stability of the platform shelter.
Adaptations for different terrain types
Adapting elevated platform shelters to different terrain types is essential for optimizing their effectiveness. In rocky terrain, consider using additional support beams and anchoring mechanisms to secure the platform and prevent shifting.
In areas with a high water table, elevate the shelter further and implement additional drainage measures to avoid moisture accumulation. For hilly or sloped terrain, adjust the platform’s leveling and support system to ensure stability and mitigate the risk of uneven weight distribution.
By understanding the specific challenges posed by different terrain types, you can tailor your elevated platform shelter to withstand the unique environmental conditions.
Underground Shelter Designs
Benefits of underground shelters in bushcraft
Underground shelters in bushcraft offer numerous benefits. Firstly, they provide a well-disguised hiding spot, allowing individuals to stay hidden from potential threats or dangers. Additionally, these shelters offer superior insulation, effectively shielding inhabitants from extreme weather conditions. Another advantage is the sense of security and peace of mind they provide, as having a secure location to retreat to can significantly alleviate stress and anxiety during crises. Moreover, underground shelters can serve as an efficient storage space for supplies and equipments, contributing to better organization and preparedness.
Step-by-step guide for constructing a simple underground shelter
Constructing a simple underground shelter in bushcraft involves several key steps. Firstly, it is essential to select a suitable location with proper soil, away from potential flood zones. Next, the excavation process begins, involving digging a trench of appropriate dimensions to accommodate the shelter. The structural framework is then built using robust materials such as wood or metal, ensuring it can withstand the weight of the soil above. Following this, the shelter is covered with a layer of protective material such as tarpaulin or plastic sheeting. Finally, the finishing touches involve reinforcing the shelter with additional support and creating an entrance while ensuring proper ventilation.
Considerations for moisture and ventilation in underground designs
Moisture and ventilation are crucial considerations in bushcraft underground designs. To combat moisture buildup, it is imperative to implement effective airflow and drainage systems within the shelter. This involves incorporating ventilation shafts and openings to allow fresh air circulation while expelling damp air. Additionally, moisture-resistant materials and coatings should be used to prevent mold and mildew growth. Moreover, strategic elevation and proper sloping of the shelter can facilitate natural water drainage, preventing water accumulation. Furthermore, the installation of dehumidifiers or moisture-absorbing materials can aid in maintaining optimal humidity levels within the shelter.
Recommended Amazon Products for Bushcraft Shelter Ideas
Here’s a curated list of products that can help you achieve effective shelter building in bushcraft activities with ease. These recommendations are based on durability, versatility, and customer reviews.
UST Tube Tarp and Camping Shelter
This versatile tarp provides multiple options for shelter building and is highly durable, making it suitable for various bushcraft shelter designs. The UST Tube Tarp and Camping Shelter is a popular choice among outdoor enthusiasts for its reliability and adaptability. You can find the UST Tube Tarp and Camping Shelter on Amazon here.
Paria Outdoor Products Sanctuary SilTarp
The Paria Outdoor Products Sanctuary SilTarp is lightweight, waterproof, and offers excellent protection from the elements. Its compact size and durability make it an ideal choice for bushcraft shelter building. You can find the Paria Outdoor Products Sanctuary SilTarp on Amazon here.
Snugpak All Weather Shelter
With its versatile configurations and weather-resistant materials, the Snugpak All Weather Shelter is a reliable option for various bushcraft shelter designs. This product is praised for its resilience and adaptability in different outdoor conditions. You can find the Snugpak All Weather Shelter on Amazon here.
Aqua Quest Defender Tarp
The Aqua Quest Defender Tarp is known for its heavy-duty construction and exceptional waterproofing, providing dependable shelter solutions for bushcraft activities. Its robust design makes it suitable for constructing reliable and weather-resistant outdoor shelters. You can find the Aqua Quest Defender Tarp on Amazon here.
OneTigris Night Protector Hammock Underquilt
For individuals interested in hammock-based shelter options, the OneTigris Night Protector Hammock Underquilt offers excellent insulation and protection from the cold. Its compact design and insulating properties make it an ideal choice for building effective hammock shelters in the wilderness. You can find the OneTigris Night Protector Hammock Underquilt on Amazon here.
Top Recommended Product for Bushcraft Shelter Ideas
If you’re looking for the best solution for building bushcraft shelters, we highly recommend the UST Tube Tarp and Camping Shelter. Here’s why:
| Pros | Cons |
|---|---|
| Versatile tarp for multiple shelter designs | May be considered slightly heavy |
| Durable and reliable in various outdoor conditions | Requires additional accessories for certain configurations Highly rated by outdoor enthusiasts |
Ready to improve your bushcraft shelter building skills? Check out the UST Tube Tarp and Camping Shelter on Amazon here today for the best results!
Frequently Asked Questions
How do you waterproof a bushcraft shelter?
What's the best material to use for waterproofing a survival shelter?
How do you build a bushcraft shelter?
What are the tips for wilderness shelters?
What is the easiest survival shelter to build?
Reference Links
- https://issuu.com/megabunker/docs/what_are_the_few_benefits_of_building_a_survival_b
- https://www.quora.com/How-do-you-make-a-winter-survival-shelter
- https://www.reddit.com/r/Survival/comments/18g65d/if_it_were_necessary_to_build_a_long_term_shelter/
- https://ehs.ncsu.edu/occupational-safety/mobile-elevated-work-platforms/
- https://www.popsci.com/story/diy/how-to-build-warm-survival-shelters-in-winter/